An operating system is a program without which no device can operate correctly. For smartphones from Apple this is iOS, for computers from the same company it is MacOS, and for everyone else it is Linux and Windows and lesser-known operating systems. We will look at how to install Windows 7 on a computer from a flash drive.
If you install the OS yourself, this will help save not only the money that a specialist will require for this work, but also the time spent waiting for him. In addition, the work is easy and requires only knowledge of the sequence of actions.
On our website there are instructions for creating bootable media with this operating system.
Our instructions for creating a drive for installing the OS can also help you.
The installation process from a flash drive itself is no different from installing from a disk. Therefore, those who installed the OS from a disk may already know approximately the sequence of steps.
Step 1: Preparation
You need to prepare your computer for reinstalling the operating system. To do this, copy all important files from the disk on which the old system is located and move it to another partition. This is done so that the files are not formatted, that is, permanently deleted. As a rule, the system is installed on a disk partition "WITH:".
Step 2: Installation
After all important documents have been saved, you can proceed to the system installation itself. To do this, do the following:

Many laptops are sold with a pre-installed version of Windows 8, which, as practice has shown, does not suit a large number of users. In addition, Windows OS of any version sooner or later becomes clogged and also requires reinstallation. Also, reinstallation is often caused by various problems with computers, for example, if it does not turn on or if it is locked. Despite the fairly large number of steps involved in reinstalling Windows, even the most inexperienced user can install the OS using these instructions.
Preparing for reinstallation
The first thing you need to do is select the disk partition to install Windows. As a rule, a hard disk partition of at least 50 GB is allocated.
If your computer already has an operating system, you should save all the necessary documents in order to reinstall the OS without losing data.
To install the OS, you will need an 8 GB DVD or flash drive, on which a bootable installation will be created.
Selecting the OS version
The most common and stable version of the OS from Microsoft is Windows 7, in some cases it is reinstalled on Windows XP. The most decisive factor in choosing Windows is the availability of the necessary drivers. To check for which OS version your laptop has drivers, you need to go to the developer’s official website and look in the support section.
Most modern laptops have drivers only for Windows 88.1, some of them are also suitable for Windows 7, unfortunately, the correct operation of all devices cannot be guaranteed. For correct operation, it is recommended to install exactly the system for which the manufacturer provided drivers.
If your laptop has more than 4 GB of RAM, you should choose the system bit size - 32 (x86) or 64 (x64). To use more than 4 GB of RAM, it is recommended to select Windowsx64.
After selecting the Windows version, you need to download it. It is advisable to download an image as close as possible to the licensed version without adding additional software. This version of Windows will be more stable and will not cause additional problems during installation of the operating system. The most common option is the Windows 7 Maximum license.
Video: How to install Windows 7
Creating a boot disk or flash drive
You must upload the image in ISO format; most options are provided in this extension due to the ease of use when creating a bootable flash drive or disk.
To create, you will need the Windows 7 USB/DVD Download Tool, which can also be downloaded from the Microsoft website.
Install the program and proceed to the main steps:
- run the program;
- Click “Browse” and specify the location of the Windows installation image in ISO format. Clicks “Next”;
- in the next menu you need to select the type of media on which the Windows installation will be recorded - USB or DVD. If the drive does not work or is missing, then there is only one option left - a USB drive;
- Next, you should select the disk on which the recording will be made. After selection, you must click “Begin Copying”;
- For a flash device, the program will ask for confirmation of formatting, for which you need to click “Erase;
- The program will display a corresponding message about successful recording.
How to completely reinstall Windows 7 on a laptop
After creating the disk or flash drive, you can reboot the computer. Do not forget that all data on the disk on which you will install Windows will be deleted. You should also take care of your Internet connection settings; you can contact your provider or record the data yourself.
To begin installation, you must restart your computer and set your device to boot from the Windows installation files.
Setting up BIOS for installation
When reinstalling the operating system from a flash drive, you must set the boot priority from a specific device, in this case, a flash drive or DVD drive. This operation is performed for installation on a computer both without an operating system and with it. Fortunately, most modern laptops have a feature to quickly select a device to boot from. To call this menu when booting the laptop, a specific key is used.
Using this table you can select a button for your device:

By clicking the button, the computer will present a window for selecting the device from which it will boot first. In our case, we choose a DVD drive or a USB drive.

There is a more complex installation option via BIOS on an empty laptop or with an installed OS. To do this, when starting the devices, go to the BIOS (the button is indicated in the table provided). BIOS from different manufacturers has some differences, so the location of the settings may differ from those shown.
In the BIOS, go to the “Boot” or “Advanced BIOS Features” section and set the First Boot Device parameter to your device – a USB drive or DVD drive. To save the settings, press F10 and select “Save and Exit”. Thus, installation is performed from Dos via a USB flash drive or via BIOS from a disk.

Reinstallation process
After completing all the settings in the BIOS, you can proceed to installing the OS. If all actions are performed correctly after booting, the system will display the message “Press any key to boot from...”. To continue, press any key and wait for it to load.
In this case, we will look at installing Windows 7; other versions have minor differences, but the principle of operation remains the same:

- in the first Windows installation menu, you must select a language, then click “Next”;
- in the next section, click the “Install” button;
- if the downloaded image includes several OS configurations, for example, “home basic” or “maximum”, then the installer will offer to choose one of the options;
- in the next menu you must confirm your agreement with all items.
Selecting the installation type
- the program has the ability to update Windows, in which all files will be saved in a separate folder. Despite this convenience, it is recommended to select the “Full installation” mode. This option provides installation of the most stable and “clean” operating system;

Formatting a partition
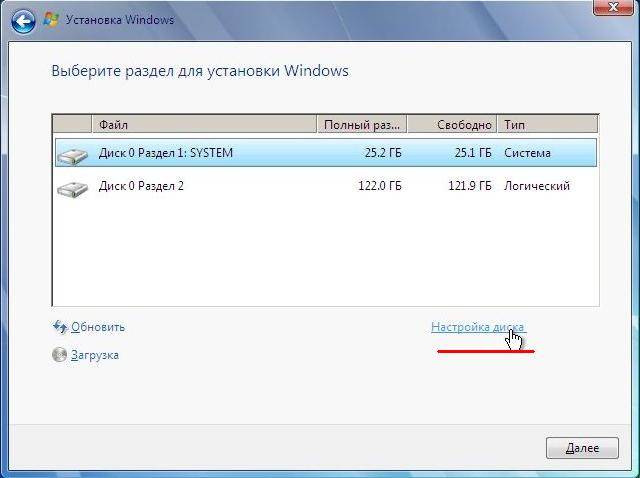
- After selecting the installation, the program will prompt you to select the disk partition in which Windows will be installed. In this menu, you can format or distribute space between your hard drive partitions by opening a set of additional “Disk Settings” options.
Unfortunately, these operations will delete all information from the disk. This function allows you to create disks of the required size, for example, if your laptop was purchased without an axis, its hard drive is not “broken.” Don't forget to format all empty disks after performing operations on hard disk partitions. After completing all the steps, select the disk and click “Next”.
- after copying, the system will prompt you to enter the user name, computer name, and password;
- as security settings to ensure computer protection, you should select “Recommended settings”;
- after selection, set the time, date and select “Home Network” in the Internet connection menu.
Attention! When you restart your computer, you should remove the disk or flash drive to avoid reinstalling Windows.
At this stage, the Windows installation can be considered complete. Now you can install drivers, as well as various software and utilities. If you have changed the computer startup settings in the BIOS, we recommend that you set it to start from the hard drive first.
Reinstallation nuances if there is another OS
How to install Windows 7 on a laptop after Windows 8? Reinstalling an OS with Windows 8 does not make any difference if there is another OS from Microsoft on the hard drive. The only recommendation is to install the new operating system on the same partition in which the current OS is located.
Video: Why Windows won't install
How to reinstall Windows 7 with problems? If your Windows does not start, you will need to use another computer to create a disk or flash device. Since the installation is performed without starting Windows, problems with the previous OS will not interfere with the installation.
This article describes in detail the process of how to reinstall Windows 7 on a laptop without a disk by formatting your hard drive partition. Thanks to a detailed description, even users with little experience will understand the principles of installing Windows 7 instead of 8. Reinstalling a new operating system allows you not only to get the desired OS version, but also to get rid of a large amount of software that is reinstalled by the laptop manufacturer.
>Already created a bootable USB flash drive, but don’t know how to boot from a flash drive? There is nothing complicated here. Booting Windows from a flash drive is very simple, and all you need to do is go into the BIOS and change one setting.
If you have not yet recorded a licensed digital copy of Windows, I recommend reading -?
How to configure booting from a flash drive?
If you simply connect a USB flash drive to your PC or laptop and reboot it, Windows installation will not start. After all, to do this you need to enable booting from a flash drive in the BIOS.
This is easy to do. But there is one nuance here. The fact is that loading Windows from a flash drive on PCs and laptops is carried out differently. Firstly, it depends on the BIOS manufacturers. And, secondly, from the laptop brand (Asus, Acer, Samsung, Lenovo, HP, etc.).
Yes, the BIOS menu will always be different, and this can cause difficulties. But below we will look at several examples so that you understand and can independently navigate the BIOS menu (in case you have another option).
So, let's begin. To enter the BIOS, you must immediately press a certain button on the keyboard when you turn on your computer or laptop. Which one? This can be found on the loading screen.
You can find out that you have entered the BIOS by seeing the corresponding menu in front of you. The following options are usually found:


If loading the BIOS failed, then wait until your PC or laptop turns on, reboot it and try again by pressing a different key.

In this case, the “Boot” item was selected, and then “Boot Device Priority” (i.e., device startup priority). As a result, a menu similar to this will open:


As you can see, they are different, but in each case there are the lines we need - First (1st), Second (2nd) and Third (3rd) Boot Device. It indicates which device boots first, which is second and third in turn. As a rule, the hard drive (HDD) always comes first, followed by the disk drive (CR-ROM).
When you connect the flash drive, the USB-HDD option will also appear. You need to select the option USB-HDD in the First Boot Device item. Example:

Next, you must save the changes, otherwise you will have to repeat everything all over again. Which save button? This information is written at the bottom of the screen. For example, in the screenshot above: F10 – “Save”, ESC – “Exit”. Save the changes and exit the BIOS. Congratulations, setting up the BIOS to boot from a flash drive is complete.
The computer (or laptop) will automatically reboot, after which the following line will appear:

Press any button and Windows installation will begin.
If you have a BIOS UEFI then everything is as easy as shelling pears
Go to BIOS and you will see something like this:

To configure booting a flash drive into UEFI, we are interested in the “Boot Priority” item. Drag the USB device icon to the top of the list (so that it is first) and exit (exit button in the upper right corner). When you exit, the system will ask you whether to save the changes. You agree, after which the PC or laptop will reboot.
By the way: it doesn’t matter at all what kind of image you have on a USB flash drive - Windows 7, 8, 10 or XP. This doesn't affect anything. The OS will start loading from the flash drive in any case (provided, of course, that it is recorded correctly).
And finally, one more very important point. When the Windows files are unpacked, the computer will reboot.

After this, you need to go into the BIOS again and return the previous device startup priority. That is, put the hard drive (HDD) in first place, and the USB flash drive in last place. There shouldn't be any problems with this.
In principle, you don't have to do this. In this case, when the black screen appears, NOTHING don't press.
Otherwise, the Windows installation will boot again and you will install the operating system again.
But when Windows is installed, you still need to go into the BIOS and return the previous device startup priority. Otherwise, the computer (or laptop) will always load data from the flash drive first (provided it is connected).
Working with a computer, especially when the Internet is connected, is always walking on the edge of an abyss: any operating system is forced to withstand powerful attacks from hackers every day, all kinds of viruses, the purpose of which is sometimes not only to pump your Internet traffic, but also to completely destroy the system. You can correct the situation, clean out destructive viruses and restore your computer's operation by completely reinstalling the system. Of course, this is a very responsible task, requiring knowledge of all the nuances of the work, but it is not so difficult. We will tell you further about how to reinstall Windows 7 from a flash drive.
So, how to properly reinstall Windows 7 from a flash drive? Let's start by saving all the data we need on any storage medium. This can be a disk, flash drive or a separate hard drive - choose depending on the amount of information to be stored.
You need to save the information because after reinstallation, all data will be completely and irretrievably lost, and the only way to restore it is by downloading it again from a third-party memory source.
But a beginner often has a question: where to look for the data necessary to save, what exactly to save... As a rule, the most important files are stored in:
- folder "My Documents";
- "Downloads" folder;
- Downloud folder.
When we are convinced that the information necessary for further work is saved to a third-party memory source, we can begin to select a future system, after which we will begin the reinstallation.
Windows 7 versions

First of all, let's look at the issue of operating system generation branches:
- 32-bit, RAM-oriented no more than four gigabytes;
- 64-bit, or professional, designed for serious work and supporting large amounts of memory.
In addition, Windows versions are divided into:
- Initial or Starter. This is the most basic version of the system, which includes only a basic set of operating functions. This option is excellent for tiny amounts of memory (no more than 2 gigabytes), which are typical for office work, but are not acceptable, for example, for loading computer games or serious programs.
- The Home Basic version is a more advanced version that supports up to eight gigabytes of memory. Designed to work with both laptops and desktop computers. It is the most common version of the system for the simple reason that it is not burdensome for the computer, is easy to install, configure, and, moreover, supports all major programs and games for individual use (not for enterprises that require an extensive network that consumes much larger amounts of RAM) .
- The Home Premium or Home Premium version is also the most common option and includes an even larger list of optional features than the previous version.
- The professional version is the most suitable option for those who prefer to work at a high level and need a large amount of information and large optional capabilities.
- And finally, the last point - corporate and maximum versions. These are the top variations of the Windows 7 system, which provide a rich set of working functions, almost unlimited scope for work and creativity
Based on personal preferences and the capabilities of their computer, everyone chooses their own type of system. And now we will dwell in detail on this nuance: how to reinstall Windows via a USB flash drive.
Before moving on to the main issue, let’s make a small digression and touch on a topic such as a program for setting up sound on a computer, which is designed to solve problems when acoustics disappear after reinstalling the OS or improving sound quality. Read about methods for connecting and setting up a printer on a computer.
Reinstallation instructions

At the moment, DVD drives are gradually becoming a thing of the past: not all laptops, and especially simplified miniature netbooks, are equipped with drives. And this forces us to look for alternative methods of downloading information. This method can be a regular flash drive. To the question of how to properly reinstall Windows 7 on a laptop, we will answer simply - the first thing you need to do is burn the image of the reinstallation disk onto a flash drive. An ISO image of Windows 7 is written using special programs (Nero, etc.) and this usually does not cause any serious difficulties, all the work takes a few minutes and is done in a few mouse clicks.
Once the disk image is recorded, you can begin the reinstallation process.
Work is carried out through the BIOS. Many novice PC users immediately feel a state of panic and horror at the mere mention of this obscure abbreviation. But don’t be scared: you’ll now find out how to reinstall Windows on a laptop from a flash drive, and believe me, there’s nothing catastrophically terrible about it - it’s a common thing that, having done it once, you’ll easily do later and... who knows, maybe... It’s good to make money on this, because good, knowledgeable programmers are always in price, and there are so many dummies... and installation via Bios is one of the mandatory and most common procedures for a programmer’s work, which makes it possible to save even hopelessly clogged with system-deadly viruses caught on the Internet.
So, reboot the computer and enter the Bios. Now we set the boot from our flash drive and wait for the installation process to complete. At this moment we don’t press anything, we just wait!
After the download occurs, exit the Bios and save the data. Now the computer is ready to install Windows 7.
In order for the installation to proceed correctly, set the date and time and click “Next”.
In the window that opens, confirm the installation of Windows 7.
We choose the version that is most suitable for you.
ATTENTION: At the next stage you will need to enter a license key. We enter the key and confirm the license agreement, after which we move on to the next stage of the boot process.
Check the box under the “Full installation” window, select the partition where Windows will be installed and click “Format”. At this moment, the complete formatting of the logical drive will begin (this is why it is important to save the necessary information in advance).
The next step is simply confirming the operations - feel free to click “Next”. A few seconds of loading will pass, and the system will prompt you to give the name of the PC and indicate a nickname. Here you can use all your imagination, the main thing is not to forget the names that you enter in the window that opens. We indicate the password and, oh finally! Enter the license key.
The system will automatically prompt you to reinstall the firewall - feel free to agree, but in the future, install an additional antivirus.
How to properly reinstall Windows 7 without a flash drive

How to reinstall Windows 7 without a flash drive, you ask. Elementary Watson.
Go to the Start menu and find Control Panel, after which you need to go to “Recovery”. In this tab, we are interested in the very bottom line called “Advanced recovery methods”; we need to run it in order to bring up the next disk formatting window. Confirm formatting and select the type of system restore to factory settings. After the work is completed, you will receive a system free of all viruses and working properly.
How to reinstall other OS from a flash drive

Windows can be installed on Android, tablet, and other OS. This is even easier to do than on a PC.
We connect the keyboard to the device and in order to enter the BIOS, press the “F2” button. Now we no longer need the keyboard, and in its place we connect a flash drive. We confirm the installation of Windows and wait. Each time the system asks for confirmation to continue downloading, click “Next”. When the reinstallation is complete, reboot your device and start from scratch.
We have considered all the nuances of the question of how to reinstall Windows on a computer from a flash drive and without a flash drive, as well as how to reinstall other operating systems. I hope this article was helpful to you. Good luck!
Most laptop users are faced with situations where they need to reinstall the operating system, often while keeping the licensed Windows. This publication discusses several methods of how to reinstall Windows 7 on a laptop, and also talks about the nuances of the process of installing the OS on laptops from different manufacturers.
Restoring the system using a Windows 7 backup
Most mobile computer manufacturers create backup storage for 7 distributions or any other OS. Reinstalling Windows 7 on a laptop from these memory areas is done using built-in utilities.
To start the reinstallation, reboot your laptop and press:
- for Windows on an HP laptop on F11;
- on an ASUS laptop on F9, boot immediately when you start;
- for Windows 7 on a Lenovo laptop on F11;
- On an Acer laptop, the key combination Alt + F10 is suitable;
- for Windows 7 on a SAMSUNG laptop on F4.
After pressing the desired key, instead of the standard Windows 7 boot, the OS recovery interface will open:
After downloading the program, follow the instructions to restore Windows.
But remember that all settings will be reset, and data from the previous copy of the system may be deleted.
Reinstalling from disk
When reinstalling from disk, remember that to restore the license you need to use a distribution kit with exactly the same OS as was installed previously. You can find out the version of the installed system on a sticker, which is usually located on the back of the laptop. By the way, the license key for your copy of Windows is also located there.

Remember that when you reinstall, a new operating system is deployed from the disk, and to avoid problems in the future, you should delete the data from the previous Windows.
This is accomplished by formatting the system partition, so take care in advance to transfer all the necessary data from the selected hard drive volume to install Windows. It is not advisable to transfer installed programs, since this will lose connection with the registry, and many of them may not start. Don't be lazy, install them again after replacing the OS.
The installation disk distribution does not include drivers for all laptops, so download the drivers for your device in advance from the manufacturer’s official resource. If this is not done, then after installation there is a high probability of the following problems occurring:
- The network card does not work;
- Wi-Fi does not work;
- Applications do not launch.
If you reinstalled the OS without this, then to troubleshoot network equipment you will have to download the driver distribution using another computer and transfer them using removable media, so before reinstalling, do not forget to play it safe and download drivers for the network card and Wi-Fi module.
To begin the installation process, insert the disc into the drive and restart your laptop. After your computer starts, open the boot menu and select boot from DVD.

This dialog is called up on most laptops using the F12 key, and on HP devices the combination F9 + Esc is used.
Often on older computers this function is missing, so you will need to open the BIOS and edit the boot priority yourself. To go to the BIOS on laptops, manufacturers use the following keys:
- Acer, Asus, Samsung, Lenovo - F2;
- hp - F10 + Esc .
If the brand of your device is not in this list, then find out the actual key for it on the window that loads when you turn on the PC.

The BIOS interface from different manufacturers is not similar in appearance, but the sequence of actions for changing the boot priority is almost identical. Navigation through the windows of a running BIOS of all versions is carried out using the arrows on the keyboard and the Enter, Esc, +, - keys.
Sequence of actions for BIOS AMI:

Sequence of action for BIOS Phoenix-Award:

Windows installation
After making a change to the BIOS and rebooting, a dialog will appear with the message: “Press any key to boot from CD or DVD.”

Further installation of Windows 7 is not difficult, do the following:
- Press any keyboard key.
- Wait until the file unpacker completes; a screen with the entry “Windows is loading files...” is displayed.

- In the dialogue " Windows installation» Specify the language and click on the Next button.

- In the window that appears, click on the large Install button.

- Select the version of the system to install that has a license code. You will need to enter it after reinstalling Windows 7.

- Agree to the licensing terms.

- Select installation method - " Full installation».

- Select the drive volume on which you are going to install the OS and prepare it by clicking on the item " Disk setup».
 There are situations when a reserved drive partition is present in the list; be sure to select another volume.
  If you have disks with a capacity of more than 250 GB, it is worth splitting them into several. Typically, a separate partition of up to 100 GB in size is allocated for system installation.
- Format the selected drive partition. A warning will appear that all information on it will be deleted. Confirm your consent, because you have previously saved all the necessary data. Wait for the installation to complete and click on Next.

- Wait for the installation process to complete; on average, it lasts from fifteen to twenty-five minutes, the duration depends on the configuration of the laptop.

- Fill in the fields provided with your username and PC name.

- Protect your account with a password, or you can skip this step.

- Enter the key copied from the sticker on your laptop.

- Select your security options.

- Set the date and time.

- If you have a network connection, specify the connection type.

Reinstalled Windows is ready to go. If you changed the boot priorities in the BIOS, return the hard drive to first place in the list, otherwise the computer will constantly try to start from the DVD.
Reinstallation from a flash drive
Many compact PCs, such as netbooks, do not have a DVD drive. Therefore, the question arises of how to properly reinstall Windows 7 on them. The answer is simple - use removable media.
To reinstall from a flash drive, you need to download the Windows 7 distribution image in ISO format and write it to this media using a special utility. Remember, in order to properly reinstall a licensed Windows system, you need to download a container with the same OS version. The flash drive itself must have a capacity of at least four gigabytes.
Burning Windows to media using the most popular utility among analogues Ultra ISO is performed according to the following algorithm:

The installation flash drive is ready, but to start the installation, you need to select " USB-HDD" How to set up the BIOS is described above, all steps are similar, you just need to select another entry from the available list. Further installation is no different from installing Windows 7 from DVD.
Often after reinstalling Windows does not work. To solve this problem, take another OS distribution and repeat the installation process. In addition, many users ignore the need to format the partition and reinstall the seven on a disk that already has an installed copy of the system. Avoid this as it can also cause problems.
Conclusion
This article covered reinstalling Windows 7 in several ways. If there is no backup copy, then this procedure should be carried out from a disk on which exactly the same version of the OS is recorded. Some laptops do not have a CD-ROM, so reinstallation can only be done using external media, for example, a flash drive.
Video on the topic